Tuesday, December 20, 2011

#30 Julekage, Panettone, and Stollen


These are three very similar recipes, varying only slightly in terms of flavoring and shaping. According to the original schedule, we were to select one of the three. But, since the recipe makes three small loaves, I decided to make one of each. My strategy was to mix the dough with out the flavorings, cardamon for the jutekage, almond extract for the stollen and orange extract for the panettone. I then added the flavoring to the mixed dough after dividing it into three portions. This strategy worked well with the stollen and panettone, but the cardamon was a bit sharp tasting in the jutekage.

Overall, the loaves worked well. With the whole grains, all three loaves were heavier than what you would normally expect for these loaves, at least for traditional recipes. Still, all three were fine. The loaves, as shown top to bottom, jutekage, stollen, and panettone.

#28 Whole Wheat Sprouted Grain Bread & #29 100% Sprouted Grain Bread


Because both of these breads use sprouted grains, I elected to make them at the same time. Since I was using wheat berries that I had purchased and frozen sometime ago, I was uncertain whether they would sprout properly. As it turned out, the grain was fine. I must admit, I was a little skeptical of the idea of a sprouted grain bread, having never had the bread before. Being unsure of how the bread would turn out was part of the motivation for making both loaves at once. For these reasons, I made a full loaf with the first recipe. For the second recipe, I made two mini loaves, the equivalent of a half a loaf.

The grain was sprouted as directed. I ground the sprouted grain using a meat grinder. The texture was a little strange but the doughs worked fine.

Frankly, the results were quite surprising. Both loaves were quite good. The texture was chewy and the flavor was fine. Perhaps more surprisingly, I preferred the 100% sprouted grain bread over the whole wheat sprouted grain bread. This is clearly a loaf worth remembering and, at some point, trying again.

Saturday, November 26, 2011

#27 Power Bread


If we don't worry about variations and choosing only one of a set (like the last choice with rye), this bread marks the halfway point in the challenge. Overall, this is a bit different from previous loaves. I wasn't quite sure what to make of a power loaf. The connotations, for me at least, are of a heavy, calorie laden bread—not something that is very appealing. The loaf is also a bit unusual in that it has a pre-soaker as well as a soaker and biga. This stretches the recipe out to three days.

Options were for a loaf or rolls (or bars). I cut the recipe in half and made a half-dozen rolls. Since the rolls have an egg-glaze, I skipped steaming the oven with no obvious ill effects. Overall, the taste was a bit unusual but not bad. These weren't particularly heavy, I'm please to report. But I would strongly suggest toasting and eating these with butter.

#26 45% Rye Bread


The next bread in the challenge is the choice among "Three Rye Hearth Bread Variations" as Reinhart puts it. We were given the choice of a 45% rye, 68% rye, and a 100% rye. Frankly, it seems a little like cheating to only be making one of the three if our goal is to work our way through the book. Still, since I'm not overly fond of rye breads, for now I'll stick to a single loaf. Perhaps I'll come back to the other two later.

My choice was the loaf with the smallest rye content. This is closer to what I prefer and, with the reduced rye content, a much easier loaf to make. I made the recipe pretty much as given. There is an option of adding caraway, nigella, anise seeds or dried mince onions. I went with the latter and regretted it. I really didn't like the aroma of the bread. Had I to do it over, I would have omitted all the optional additions.

I chose a log-shaped loaf and played with another type of scoring that I've often seen on small rye loaves. Overall, a pleasant loaf.

#25 High Extraction Flour Miche


For this recipe, I cut things in half making one small miche. Not having high extraction flour, I followed Reinhart's suggestion and used a mixture of whole wheat and bread flours. The dough was a bit slack, as can be seen in the pictures that accompany the recipe in Reinghart's book. But apart from that, there were no problems with the recipe. This was a fairly ordinary loaf similar to may other whole wheat loaves.

#24 Multigrain Hearth Bread


This was a nice, pleasant, but fairly unremarkable bread. For this recipe, I used cooked Quaker's Multi Grain cereal. This was a mistake as it was too wet. To adjust, I cut back the recommended water to 100 grams and made up the difference with King Arthur Harvest Grain blend. This was still much wetter that most of Reinhart's soakers so I had to make some adjustments with additional flour for the final dough.

That said, the combination of cereals gave me a wide range of flavors. And with the adjustments, the dough behaved nicely. The oven-spring was a bit weak but okay. I played with a new scoring pattern that I think worked well.

Overall, the bread was a bit dense, but fine. On the other hand, it isn't a loaf I'll be in a hurry to get back to.

Sunday, October 30, 2011

#23 Whole Wheat Hearth Bread


This looked to be a pretty standard loaf, so I decided to play around with it a bit. Hoping for a rounder (i.e., taller) loaf, I decided to bake this in a dutch oven following the protocol used with no-knead breads. (Otherwise, I followed the directions as given.)

As can be seen, I did get a somewhat rounder loaf, but I got a fairly poor oven spring and a somewhat dense loaf. (Up until it went in the oven, it seemed on coarse for a light, well-risen loaf.) Overall, this gave a reasonable loaf with a pleasant taste, but a bit too dense. I guess I'll have to shoulder the blame for that.

#22 Whole Wheat Challah


Although I haven't posted on it yet, as part of the Hamelman Challenge, I recently made a Berne Brot, a challah-like bread but with milk replacing the water and butter replacing the oil. The Berne Brot was so much tastier than challah in general that I found it a bit hard to face making a whole-wheat challah.

I followed the recipe as given using agave nectar and sesame seeds. The braiding instructions for a six-braid were very hard to follow. I ended up ignoring them and doing a standard braid. The results were a very large loaf. Overall, this is not a bad loaf, but I'm definitely in the Berne Brot camp now.

Saturday, October 15, 2011

#21 Whole Wheat Cinnamon Raisin Buns


Finally, another new recipe! And a pretty good one. For the dough, I followed the recipe fairly closely. I used milk throughout, agave nectar, and a mixture of butter and oil. This produce a nice soft cinnamon bun.

For the filling and toppings, I was a little more creative making a mixture of different buns. If the buns look different, there is a good reason—they are different. The night I started these, I watch Todd Wilbur on CMT as he tried to reverse engineer Cinnabon Cinnamon Rolls. So for some of these, I used his recipe for Cinnabon filling along with a few minor variations of my own. The rolls starting at the top right of the picture have Wilbur's recipe. Those at the lower left have Reinhart cinnamon sugar. Those in the middle row have one or the other of the filling but with additional butter spread on the dough.

I did make one change in Wilbur's recipe—I cut the amount of xantham gum in half as the amount in his recipe seemed excessive. I also used his topping recipe on some of the buns.

Overall, while I'm not that big a Cinnabon fan, I preferred the buns with Wilbur's filling and the extra butter. The topping was also an improvement. (I keep this in the refrigerator and add it to the buns at serving time.) Reinhart's recipe doesn't give a very sweet bun so a slight drizzle of fondant isn't enough for my sweet tooth. Overall a good recipe.

#20 Whole Wheat Cinnamon Raisin Bread


This is another recipe I've made before, but not one I minded making againb. We are back to a one loaf recipe with this bread. I used a mixture of dried fruit rather than raisins—dried cherries, cranberries, blueberries and plums—a combination that worked quite well. I chose to flatten the dough and then roll the fruit and nuts up in the bread. This disrupts the gluten a little less. Also, I used walnuts and a strong Vietnamese cinnamon (or cassia) for this bread.

The recipe worked pretty much as expected. It took somewhat longer to rise than most breads (no surprise here). The cooking temperature was quite low—325 degrees F. Frankly, I suspect this is a bit too low. The bread took a long time to cook and the crust was quite dried out and very dark before it was done.

Overall this is a recipe I like. But that said, I find the cinnamon raisin bread in the Bread Baker's Apprentice spectacular. So I would likely go to the BBA before making this one again.

Friday, October 14, 2011

#19 Anadama Bread


This is a recipe that I'd made before shortly after buying Reinhart's book. I've also made Anadama breads before as part of the Bread Baker's Apprentice Challenge.

In fact, I made the original recipe in BBA and a variant where I replace the molasses with golden syrup. And while this might not be authentic anadama bread, I definitely preferred it to the original recipe. So this time around, having previously made the recipe, I decided to experiment some more. This time, I replaced the molasses with maple syrup. Otherwise, I followed the recipe as written using Bob Red Mill Cornmeal.

Overall, the bread was quite good. It did not have a maple flavor, but was well flavored. I found the cornmeal way too gritty for my taste. If I were doing it over, I think I would try a corn flour. And I think I would go back to the golden syrup. Still, a good bread.

#18 Potato Rosemary Bread


After several rye breads, this bread was a welcome change. I'm partial to potato breads and like rosemary, so I was looking forward to this bread and I wasn't disappointed.

This was another two loaf recipe. And, once again, I cut the recipe in half. I skipped the optional garlic and went with fresh rather than dried rosemary. Otherwise, I followed the recipe.

Reinhart describes the rosemary as a subtle presence. While not overly strong, I wouldn't describe the taste as subtle. Still, as I said, I like rosemary so I didn't find the bread overly strong. Overall, a fine bread.

Sunday, September 18, 2011

#17 Potato Onion Rye Meteil


Overall, this recipe was enlightening but frustrating. First, for this bread, Reinhart gives a recipe that makes two loaves instead of the usual one—something I initially overlooked. My intention had been to make three half-loaves but I ended up making three full loaves, a lot more bread that I wanted or can use.

Also, along the way, I discovered source of another problem I was having. I typically use a fairly wet starter when making sourdough breads—a starter that is equal parts flour and water. This makes feeding the starter particularly easy. I should have remembered that Reinhart's recipes call for a stiffer starter (or checked), but I didn't.. (I read the introductory material in the book quite some time ago. Obviously, I need to reread it.) It is fairly easy to correct for a wet started, but this isn't something I have been doing. And since these recipes use a hefty amount of starter, I've been adding more water/less flour than the recipe called for. Hence the sticky dough. Mea culpa.

My goal in making three (half) loaves was to experiment with the kneading to see what really works best and to see if that was the cause of the problem with the last loaf. There is some inconsistencies among bakers as to the optimal kneading of rye breads. It is certainly the case that rye breads can be over kneaded. But, there is also the question whether you want to go until the dough passes the window-pane test or stop just short of that point. The rational of stopping a bit short is that the gluten will continue to develop during fermentation and proofing and with additional handling.

With this in mind, I set out to make three otherwise identical loaves but with different degrees of kneading. I began by mixing one large batch of dough, one and a half times the original recipe up to the point of kneading. I then divided the dough into three equal portions and kneaded by hand the first portion three minutes, the second portion five minutes and the last portion seven minutes. The first loaf was way short of passing the window-pane test, the second loaf just short of passing, and the third loaf clearly passed the test.

The loaves are shown left to right in the first picture and from bottom to top in the second picture. The under-kneaded loaf clearly fell short of an optimal loaf. It was the slackest loaf, had a dense crumb, and showed the crumbly crust around the scoring seen in my previous loaf. The loaf that was just short of passing the window-pane test proved to be the best loaf by a small margin. It had the most pleasant crumb and the best shape.

As an aside, where Reinhart says you can use either rye or whole wheat flour, I used an equal mixture of the two. In Reinhart's Baker's Formula, he reports that the bread is 24% rye and 76% whole wheat. In doing so, he is clearly assuming that the baker is using all whole wheat when faced with a choice. The percentages would be reversed (roughly) if the baker used all rye instead. In using an equal mixture, I made a loaf that was about 50% rye.

As for overall taste, this recipe is okay. The experiment will help me judge my loaves and improve. But this isn't a recipe I'm likely to make anything soon. And I certainly wouldn't make two full loaves, let alone three.

#16: Rye Sandwich Seigle


This was pretty much a repeat of the last loaf but with a lot more rye (60% rather than 40%). Again, I made a half loaf. I used milk and molasses and skipped the optional seeds.

The dough was uncharacteristically wet and sticky—very difficult to work with. The results were a heavy, unattractive loaf that tended to crack and produced a ragged looking texture around the scoring. I suspect this came from under-kneading the dough (in part because it was so wet and sticky). This tasted okay but was not a loaf to get excited about. This isn't a loaf I'm likely to make again.

Sunday, September 4, 2011

#15: Rye Sandwich Meteil


Because I'm not overly fond of rye breads and, as part of the Hamelman Challenge, I had just made a three and half pound plus miche the day before, I elected to make half the recipe for this bread. And, since I was making half the recipe, I mixed and kneaded the loaf entirely by hand rather than use my stand mixer. Overall, I think this improved the loaf and may make this a standard practice when making rye breads. I used molasses rather than the other choices; I used the optional minced dried onions; and I omitted the optional seeds.

This produced a very nice little boule with a pleasant flavor. It should be noted that the onions dominated the flavor of the bread, but that was fine with me. This did not have a strong rye taste.


Sunday, August 28, 2011

#14: Oat Bran Broom Bread


So here is my shot at the Oat Bran Broom Bread. I, for what it is worth, could have gone for a less descriptive name. The recipe is very much like the others that have gone before—make a soaker, make a biga, mix these with a few other ingredients the next day, and then jump to another page to see how to finish the bread.

The recipe produces a very pleasant if nondescript loaf. Reinhart suggest making it either in a loaf pan or as a free-standing loaf. There seems to be some inconsistencies with the French terminology. Reinhart calls for making a bâtard, by which he means a torpedo shaped loaf. This seems to be pretty standard usages in the US but I gather the French use boulot for a torpedo shape while a bâtard is more a log shaped loaf. (Any clarification or corrections would be appreciated.) In any event, I opted to make a log-shaped loaf.

The crust is, well, nondescript. It didn't brown very deeply, and the slashes seemed to disappeared into the crumb. This is a loaf that calls out to be brushed with butter or decorated with seeds. In the photo in the book, it appears that Reinhart covered the top of the loaf with bran. With his merging of recipes, this is a detail that seems to have been omitted from the recipe.

Overall, this is a pleasant loaf that I would repeat.


Thursday, August 25, 2011

#13: Multigrain Struan


Struan, Reinhart says, launched his baking career. A recipe for struan, in one from or another, can be found in most of Reinhart's books. It certainly seems to be one of the recipes that he is particularly proud of and justifiably so. All the various recipes are for multi-grain breads and use a variety of seeds and grains. There is actually a great deal of leeway in all of his struan recipes when it choosing these. Yet every time I have made one of his struans, it has worked, often with spectacular results. I particularly recommend the recipe in Bread Baker's Apprentice. And, on the off chance you have leftover struan that is starting to go stale, cubes of the bread fried in butter or a good olive oil make an astonishingly good crouton.

For this recipe, I used some of King Arthur's Harvest Grain Blend that I had in the freezer, a product with which I have been particularly pleased. This is an ideal loaf for sandwiches, so I went with the loaf pan, but I expect it would make great dinner rolls as well.

This is a good loaf that I would readily recommend. This particular struan turned out, for me at least, a bit heavier than the others I've made in the past. Still, I just finished a peanut butter sandwich made with this bread and am happy to report that it was quite tasty. A great bread.


#12: 100% Whole Wheat Sandwich Bread


Starting with this loaf we are leaving the transitional breads behind. Now we are in serious whole grain territory. Although not on the cover of the book, this is (or at least should be) the iconic loaf for this book. This is the first recipe in the book and one of the recipe that Reinhart refers back to in later recipes, "Proceed as in steps 3 through 7 in the whole wheat sandwich bread on page 97."

While the recipe can be made in a loaf pan, as a free standing loaf, or even as rolls, for me a "sandwich bread" calls out for a loaf pan. I slightly doctored the recipe, as can be seen in the before and after pictures to the right. The original recipe gives a crust that is flat and dull. All I've done (second picture) is brush the loaf with melted butter. The recipe doesn't call for this, but it is easy to do and dramatically (I think) improves the appearance of the loaf.

Overall, this is a quite reasonable loaf. The recipe is clearly written, and I didn't encounter any problems. The flavor was good, but I wasn't overwhelmed by it. I found the bread a bit dry and the loaf didn't keep particularly well. Overall, I prefer the first loaf in the challenge, the Transitional Whole Wheat Sandwich Bread to this recipe. But that is just my preference.

#11: Transitional Rustic Bread & Focaccia


This is a recipe I'm returning to. It can be used to make either two loaves of a rustic bread, basically a ciabatta, or one focaccia (or even several mini-baguettes). Although it has been a while, I have done all of these. This time around, as you can see, I went with the ciabatta.

I'm a big fan of both ciabatta and focaccia. In fact, a couple of years ago, I attended Peter Reinhart's Saturday morning course on making focaccia and pizza at Johnson and Wales in Charlotte, a course I recommend. Although this book was out at the time, in that course we stuck to white bread flour. Sometime after the course, I tried this recipe a couple of times.

Overall, the loaves were quite good. They don't quite deliver the light chewiness of a traditional bread-flour ciabatta, but they are still reasonably light, chewy and they do have a good flavor. (Yes, I admit that my preference runs toward white bread flours rather than whole wheat flours. Perhaps focaccia, with the distraction of toppings, is a better choice for me. )

As a transitional bread, it will be interesting to see how this compares to 100% whole wheat ciabattas. This is a recipe well worth making again. Perhaps I can find the time in the near future to redo this recipe making the focaccia. If I do, I'll update this post.


#10: Transitional German-Style Many Seed Bread


When it comes to whole grain breads, my preference runs toward seeded breads or struans, so I was particularly looking forward to this bread. While I can't say I'm big on flax seeds (they have a slightly slimy mouthfeel for me) or even pumpkin seeds (bland), I love sesame seeds and sunflower seeds.

The results were a little disappointing. Don't get me wrong, this isn't a bad loaf, but it just didn't live up to my expectations. I found the dough somewhat stiff and difficult to work with. As can be seen from the picture, I didn't get a particularly smooth dough. Still, this was a good if not great loaf. And it is a loaf that might be worth revisiting sometime in the future when this challenge is over.

Monday, July 25, 2011

#9: Transitional Rye Hearth Seigle


This is the next step with rye. With this loaf, we have gone from 33% rye to 56% rye. And the rye flavor is beginning to come through.

With this loaf, we are shifting over to using a starter. Reinhart calls for a stiff (63% hydration), whole wheat mother starter. Unfortunately, my mother starter is a bread flour starter with 100% hydration. With this in mind, I worked backwards adjusting various levels to mimic what Reinhart calls for. Here's what I did: 71 grams of Reinhart's mother starter would contain 27 grams of water and 44 grams of whole wheat flour. So I used 54 grams of my mother starter (27 grams flour and 27 grams of water) to get the correct hydration and then added an additional 17 grams of flour. Also, I replaced 44 grams of the bread flour with whole wheat flour. Finally, I gave the starter for the loaf a little extra time to catch up.

And, (surprisingly?), this all seems to have worked quite well. This was a very pleasant loaf. I got a nice rise. It wasn't at all heavy. And it tasted great with peanut butter, the ultimate test for any rye bread.

#8: Transitional Rye Hearth Meteil


With this loaf and the next, we seem to be working our way through rye breads, slowly increasing the percentage of rye. And thus far, everything has gone fine.

As can be seen, I'm playing with flour and slash patterns. This one worked fairly well. The spiral was made with a series of short slashes. With rye breads, I sometimes have problems with the oven spring not fully filling the slashes. This time the spring was okay, but perhaps on the edge of what is acceptable.

I've been using medium rye flour from King Arthur's on these last few loaves (and the next). These have all be pleasant loaves, but none have had a particularly strong rye taste. For this loaf, I used the optional molasses and the lemon zest. There was a strong lemon aroma from the oven, but this did not carry over to the loaf.

For me, this was another good, solid competent recipe, but I was not blown away by the results.

#7: Transitional Multigrain Hearth Bread


So here is another multigrain bread. In baking this bread, I used all the optional seeds. And, as is my habit, I used a cloche. Everything went okay with the baking. With the scoring, I could only use a small stencil and didn't get a very clean edge. And, clearly, I didn't manage to get a very good picture.

I generally prefer this kind of multi-seed bread so I thought it was an okay bread. There certainly weren't any problems with it. But I really can't get excited about it. I've made a lot of breads in this style, and this one just didn't stand out. Perhaps it was this particular loaf. I don't have plans to make it again to see. There are simply too many other loaves that I know work and that I know I like to invest any more effort in this loaf.

#6: Transitional Country Hearth Bread


This was a very straight forward country loaf. I tried this recipe a couple of times. As can be seen, I played with a stencil the first try and tried to do some simple decorative shaping the second time around.

The stencil worked very well. This was a plastic stencil I bought at a hobby and crafts store. It was simply a matter of holding the stencil on the bread, dusting with flour, and carefully removing the stencil. This, of course, is done just before the bread goes into the oven.

With the shaped loaves, I did the cuts too soon. These cuts should have been made just before the loaves went into the oven. When I made the cuts, I wasn't quite ready to put the loaves into the oven. As a result, I didn't get the nice clean definition on the cut areas and the edges tended to round too much. It seems I learning how to make decorative breads one mistake at a time.

Overall, the loaves were quite pleasant. The preparation was straightforward and the directions were clear. Still, I've not been won over to whole grain breads yet.

#5: Transitional Challah


Challah was one of the first breads I learned to make, and I've made it many times. Frankly, a whole wheat version seems just a little strange to me. But then, challah is not part of my cultural heritage so perhaps this is just me.

At his presentation at the 2010 Asheville Bread Festival, Peter Reinhart remarked that the secret to good challah is the realization that egg whites tend to dry out the loaf. Replacing some or all of the whites with yokes gives a less dry loaf. This realization seems to have come to Reinhart gradually. In his 1999 book, Bread Upon the Waters, he uses four eggs. In both his 1998 Crust & Crumb and his 2001 Bread Baker's Apprentice, he uses two whole eggs and two yokes. By 2007, this transitional loaf calls for one egg and four yokes. In 2009, his Artisan Breads Every Day call for four-to-five yokes per loaf with no whites. This last recipe produced the best challah I've ever made by a wide margin. With this in mind, it might be interesting to make a similar adjustment to the transitional loaf. This is certainly something to keep in mind for our eventual return to Challah.

In making this bread, I used four strands of dough since this was the easiest way to do the division. (In the past I've played with other patterns including on attempt at a star. See the posts for my Hamelman Challenge for October 2010 if you are interested.) As it worked out, one strand was a bit too long so I had a little dough left over. I used this to add a bit of decoration to the loaf. (Gilding the lily perhaps?) Unfortunately, I ran this diagonally across one end of the loaf and as the loaf expanded, the decoration broke into two pieces.

Overall this is a good loaf but I prefer Reinhart's more recent recipe.

Tuesday, June 21, 2011

Aside: Using a Cloche


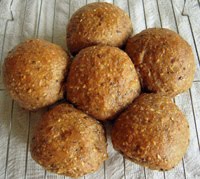
I've mentioned a couple of time that I use a cloche or Romertopf lid frequently in baking. If you are interested, here is a brief description of what I do. If you are unfamiliar with it, a cloche is an unglazed stoneware dish with a bell-shaped lid (as shown in the first picture). Dating back to early Greeks and Romans, traditionally, it was used as a portable oven. Food was placed in the dish to bake, covered, and the embers were placed around the cloche. A cloche can be used for any form of baking, not just breads.

The cloche shown in the picture is a Superstone(r) La Cloche that's I had for years. Typically, the loaf is place in a dry cloche at room temperature and then the cloche is place in a hot oven. However, this is not what I do. Inspired by a demonstration by Lionel Vatinet at the Asheville Bread Festival a couple of years ago, I now pre-soak the lid. That is, I fill it with water and let it sit for 15 minutes or so as the oven, with a pizza stone, preheats. I carefully drain the water from the lid, place the loaf on the pizza stone, and then cover it with the lid and close the oven. (I do not use the bottom of the cloche.) After about 10 or 15 minutes, I carefully remove the lid and allow the loaf to finish baking.

CAUTION! You need to be very careful when removing the lid because a lot of steam and water vapor will be released from under the lid when you remove it. It is very, very easy to get a nasty burn if you aren't careful. Having a handle on the lid is a real convenience!

If you don't have a cloche or if you are working with a longer loaf, you can substitute a Romertopf lid for for the cloche lid. I use the cloche lid for boules and the Romertopf lid for bâtards. When working with the Romertopf lid, however, it is much more difficult to remove the lid from the baking stone safely. I slide the lid slightly to one side so it overhangs the edge of the stone, and I'm very careful to keep something between me and the escaping steam and water vapor.

Why bother? The cloche or Romertopf lid provides a micro-environment with a very large amount of steam. With this approach, I get much better results than I've ever gotten with the other approaches at generating steam, be it a cast iron pan filled with boiling water or ice on the floor of the oven. Indeed, there is no point in bothering with any of these other approaches if you are covering the bread with a cloche or Romertopf lid.

With this approach, you'll get a great oven spring. In fact, you need to be very careful. If you have a large loaf to begin with, it may expand enough so that it sticks to the lid!

Is the soaking really necessary? I don't really know. I've baked a second loaf following a first without resoaking the lid (for fear the hot lid would shatter if I tried to soak it), and it didn't seem to make much difference. I've also replace the lid once with a disposable foil pan when the loaf was clearly too big to fit under either of the lids I own. This is something I have heard about from others and it also seemed to work fine. But I already own both the cloche and the Romertopf so I've stuck with what I know works. But perhaps I play around with alternatives in the future. Stayed tuned.

Wednesday, June 15, 2011

#4: Transitional Cinnamon Raisin Bread


In The Bread Baker's Apprentice, Peter Reinhart has an extraordinary recipe for Cinnamon Raisin Walnut Bread that I've been making for several years. This is a wonderful, rich bread that stands on its own, or, that can be used to make an astonishing pain perdu. (I strongly recommend the recipe from America's Test Kitchen.) This bread is one of my all-time favorites.

So, when I bought a copy of Whole Grain Breads, the Transitional Cinnamon Raisin Bread was one of the first recipes I made. I've use this recipe to make both loaves of cinnamon bread and cinnamon rolls.

This is certainly a recipe that you can do variations on. For example, I often add nuts along with the cinnamon sugar prior to rolling up the loaf. An I've been known to augment or replace the raisins with dried cranberries or dried cherries. This time around, I went back and made the basic loaf using half the dough. (This is the bread on the right in the photo.) With the other half of the dough, I made a minor variation (shown on the left). After flattening the dough and dusting with cinnamon sugar, I added walnut before rolling the dough into a loaf. Also, when I took the loaf from the oven, I brushed it with butter and sprinkled cinnamon sugar on top, a suggestion from The Bread Baker's Apprentice.

This transitional recipe produces a very nice loaf of bread. The dough was shaggy and a bit harder to work with than most. The cooked loaf, while not what I would call dense, was substantial and chewy. The flavor is excellent and is almost as good any cinnamon bread that you are likely to find, whole grain or otherwise. Almost. In this case, Chef Reinhart has set the bar too high with his original recipe. And, compared to the original, this new loaf just doesn't quite measure up.

#3: Transitional Rye Sandwich Bread


This was a surprisingly pleasant loaf. In the past, I've been pretty indifferent toward rye breads.
But since starting the Hamelman Challenge, my attitude has become increasingly negative as I baked more and more, heavier and heavier traditional rye breads.

But this loaf didn't suffer any of the defects I'm coming to associate with rye bread. I found it a very light and pleasant loaf. In fact, it doesn't really seem like a rye bread at all.

For this recipe I followed the directions fairly closely. I used molasses and agave nectar. I included the optional oil but omitted the optional caraway seeds. I did elect to make a fendu rather than a loaf-pan bread or a standard bâtard. Unfortunately, the loaf was a bit to short and wide to yield an attractive fendu, something to remember in the future. And, as is my wont, I baked this under a Romertopf lid rather than use a steam pan.

The loaf had a few minor but unsightly cracks, probably a consequence of the overall shape. But apart from than, this produced a lovely, light bread with a mild flavor. After making this bread, I'm hopeful that Reinhart will change my attitude toward rye breads.

I made the loaf a second time playing with the shape. This time I made a "daisy loaf" as described in Special and Decorative Breads by Biheux et. al. I got the center roll a bit too large but I liked being able to used different seeds. This pulls apart nice with rolls that can be sliced and used as hamburger buns.

Friday, June 10, 2011

#2: Transitional Multigrain Sandwich Bread


The second loaf is a multigrain loaf. This seems to be Reinhart's forte. I pretty much followed the recipe as written using cooked brown rice, flaxseeds, and buttermilk.

This is a fine loaf. I definitely prefer it to the previous loaf. A great recipe!

#1: Transitional Whole Wheat Sandwich Bread


The first recipe in the challenge is a transitional loaf, one that uses both white and whole wheat flour rather than all whole wheat to "transition" the baker over to whole wheat. This is a recipe that I've made before, so I was a little sloppy and didn't notice that I needed to cut the oven back when the loaf went in. As a result, I didn't get much oven spring from the loaf and had a much shorter cooking time. It was still a usable loaf but not great.

As a consequence, I went back and made the loaf a second time and got it right this time. Rather than use a loaf pan, I made a free-form loaf using a Romertopf lid like a cloche. Basically, I fill the inverted lid and let it soak while the oven preheats. When I place the loaf on the baking stone, I cover it with the (drained) Romertopf lid for about 15 minutes. Then I carefully remove the lid (it is very easy to get scalded by the steam from under the lid) and finish baking the loaf. With this approach, I don't need to bother with a steam pan and I find I get much better results.

This is an interesting recipe as the soaker and the biga are about the only thing going into the loaf. I used buttermilk which seemed to work well. There were some minor difference in the soaker from one loaf to the next. The first was more liquidy than the second. Still the recipe worked well and the results were fine.